Guide · Guides
How to drill gel polish off safely
The rule that prevents every injury in this job: the drill removes product, acetone removes the rest, and you stop while there is still color left.
Written by Janet H. · Owner, Janet Media Group
Published
Tip & Topcoat is reader-supported. Product links go through our affiliate resolver and we may earn a commission from qualifying purchases, at no extra cost to you. Prices come from Amazon's API, carry the date they were read, and change constantly — the button always opens the current price on Amazon.
Part of the guides hub.
How to remove gel polish with a nail drill · 8 steps
Step 01
Fit a medium-grit ceramic safety bit
Ceramic runs cooler than carbide and does not clog on gel. The rounded safety top skates off skin instead of cutting. Seat the shank fully and lock the collet with the machine off.
Step 02
Set a low speed and check the rotation
Start at the bottom of the dial and bring it up only until the bit removes material without pressure. Set the rotation so the bit pulls away from the sidewall skin on the hand you are working on.
Step 03
Break the top coat seal first
Take the shine off the whole nail in light continuous passes. This is the layer that stops acetone getting in, and it is the only pass where you cover the entire surface.
Step 04
Work the body of the color down in sweeps
Keep the bit moving across the nail at all times and lift off every few seconds. Hold it flat to the surface, never angled into it, and never let it stall in one place.
Step 05
Stop while you can still see color
This is the whole safety rule. Leave a thin, even veil of product over the entire plate. If you can see your own nail anywhere, you have gone too far on that nail.
Step 06
Keep clear of the cuticle and sidewalls
Leave the last millimeter at the cuticle and the sidewall grooves entirely alone. Acetone reaches those; a bit should not.
Step 07
Wrap each fingertip with acetone and cotton
Soak cotton in acetone, hold it against the nail and wrap the fingertip. Leave it ten minutes. Soaking only the fingertips is the AAD's own method.
Step 08
Push the softened remainder off and oil
Push the softened gel off with a wooden stick in the direction of growth. If it resists, wrap again rather than scraping. Then oil the cuticle and keep oiling daily for a week.
The rule that makes this safe
There is one idea behind every step below, and if you only remember this, you will not hurt yourself: the drill takes product down, acetone takes it off. You stop with color still visible on every nail, and acetone deals with the last layer.
The reason is arithmetic. A gel polish set is a few tenths of a millimeter thick. Your nail plate is around half a millimeter. There is no visual cue that reliably tells you when you have gone through the last of the product, because the product thins unevenly and the color fades gradually. By the time you can see nail, you are on nail.
Gelish's own removal routine for its builder gel assumes roughly 80% of the product is filed off before soaking, which is the professional framing of the same rule: most of it, not all of it. The AAD's gel removal method is the finishing step, and it works far faster on a thinned set than on a full one.
The bit and the speed
Two choices, made before the machine goes on, decide most of the outcome.
The bit. A medium-grit ceramic safety bit. Ceramic because it runs cooler than carbide at the same speed and does not clog the way metal does on gel — clogged flutes stop cutting and start generating heat, which is the mechanism behind every burn in this job. Safety because the rounded top skates off skin instead of cutting it, and you will touch skin.
What not to fit: a coarse carbide barrel. It is the right tool for bulk acrylic and far too fast for gel polish on a natural nail. It removes material quicker than you can judge, and the margin here is a few tenths of a millimeter.
The speed. Start the dial at zero and bring it up until the bit removes material without you pressing. That is your speed. If you are pressing, the grit is too fine or the speed is too low, and pressure is what pushes heat into the nail bed. The professional guidance on e-files makes the point directly: speed and pressure are the two variables that cause damage.
Check the rotation direction for the hand you are on. The bit should sweep away from the sidewall skin, not into it. On a machine with a forward/reverse button that is one press; the direction is opposite for the two hands.
The passes, in order
Gel does not come off in one motion, and the order of the passes is what keeps the heat down.
| Pass | Where | What you are doing | Stop when |
|---|---|---|---|
| 1 — break the seal | Whole nail surface | Taking the shine off the top coat | The gloss is gone everywhere |
| 2 — body of the color | Center two-thirds | Thinning the color layer in sweeps | Color is pale and even |
| 3 — the free edge | Tip and the last few mm | Thinning where the product is thickest | No ridge of product at the tip |
| 4 — stop | n/a | Checking every nail for a visible veil of color | Every nail still shows color |
Three habits run through all of it. Hold the bit flat to the surface, never angled into it — an angled bit digs a groove. Keep it moving in continuous passes rather than working one spot. Lift off every few seconds so the plate can shed heat, because heat builds faster than it feels like it does and the warning sign arrives after the damage.
The two places a bit should never go
The cuticle line. Leave the last millimeter of product at the base entirely alone. The skin is right there, the plate is thinnest where it emerges, and there is no technique that makes this safe at home. Acetone reaches under that edge perfectly well once the rest is thinned.
The sidewall grooves. The narrow channels where the plate meets the skin at each side. A bit in a sidewall groove is a bit against skin at an angle, and the safety top cannot help you there because it is the side of the bit doing the work, not the top.
Both of these are the places people go when they are trying to get the whole set off with the drill, which brings it back to the first rule. You are not getting the whole set off with the drill.
Finishing with acetone
On a properly thinned set this takes about ten minutes, against twenty to thirty on an untouched one. That difference is the actual reason to own a drill for this job.
- Soak cotton in acetone, hold it against the nail, and wrap the fingertip. Pre-attached cotton wraps make this a ten-second job per finger rather than a cotton-ball-cutting exercise.
- Leave it ten minutes. Check one nail before unwrapping the rest — if the gel is not soft, wrap it again.
- Push the softened product off with a wooden stick, in the direction of growth, with no force. Scraping is what takes plate with it.
- Buff any residue with the lightest grit you own, once, and stop when it is smooth.
- Oil immediately and keep oiling daily for a week. Acetone dries the plate, and dryness is what people read as damage.
Fingertips only, not a bowl. That is the AAD's own framing and it keeps acetone off the skin of your hand. One note on wraps: the AAD actually prefers plastic food wrap to foil, because plastic seals tighter and drips less — if you have cotton and cling film in the kitchen, that combination is free and works.
When not to use a drill for this at all
A drill is the right tool for this job if you remove gel often, and overkill if you do not. Three cases where the answer is just acetone:
- You remove gel a few times a year. Twenty minutes of soaking against the cost and the learning curve of a machine is not a close call.
- Your nails are already thin, peeling or sore. Add nothing mechanical to a plate that is recovering. The routine is in repairing nails after gel.
- You have never used a drill before. Learn on a set you are removing anyway, at low speed, on one nail — not on all ten in a hurry. The basics are in how to use a nail drill.
And if the gel is lifting rather than intact, a drill is the wrong answer entirely — lifted gel means water has been under it, and that set needs to come off with acetone and not be thinned. The causes are in why gel polish peels. The drill-free method is in removing gel polish at home, and the machine picks for this job specifically are in best nail drill for gel removal.
Picks
The three things this method needs
A ceramic safety bit, a drill with controllable low speed, and the wraps that do the last step. Acetone is a separate purchase in every case.
Taking gel and dip off without touching the skin
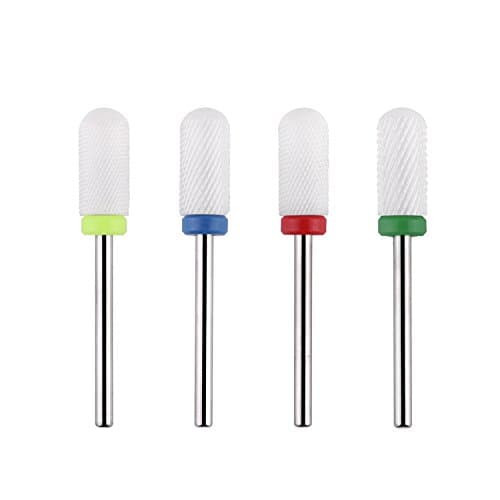
Makartt Ceramic Safety Nail Drill Bit Set
Ceramic safety bits in the standard 3/32 in shank — the rounded top is what keeps the bit off your cuticle.
- Shank
- 3/32 in (standard)
- Type
- Ceramic, safety (rounded) top
Skip ifSkip this if you are removing thick acrylic every week. Carbide cuts bulk faster and survives more abuse.
A first drill you will not immediately hurt yourself with
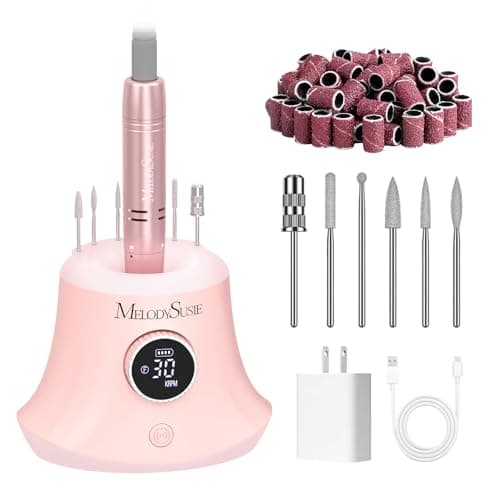
MelodySusie SC320G Rechargeable Nail Drill
Cordless, one-button forward/reverse, and a dial that genuinely starts near zero — the combination beginners need.
- Speed
- 0–30,000 RPM, dial
- Power
- 4000 mAh, 8–12 h per charge
Skip ifSkip this if you want a pedal so your free hand can steady the finger. The corded Scarlet has one.
Taking gel off without soaking your whole hand in acetone
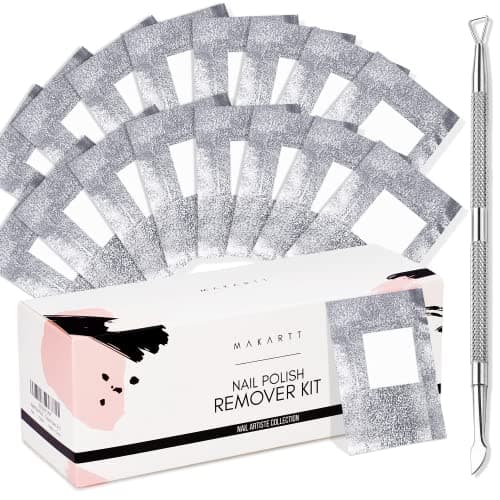
Makartt Soak-Off Gel Remover Foil Wraps
Pre-attached cotton on a heavy foil wrap, which is the difference between a ten-minute removal and a thirty-minute mess.
- Count
- 200 wraps with cotton attached
- Foil size
- 9 × 6.5 cm
Skip ifSkip this if you already have plastic food wrap and cotton at home. That combination is what dermatologists actually recommend, and it is free.
FAQ
Frequently asked questions
Can you use a nail drill to remove gel polish?
Yes, to thin it. Take the gel down with a medium ceramic safety bit at low speed until a thin veil of color remains, then soak the rest off in acetone. A drill that goes all the way to the nail goes into the nail.
What drill bit do you use to remove gel polish?
A medium-grit ceramic safety bit. Ceramic runs cooler than carbide and does not clog on gel, and the rounded safety top skates off skin instead of cutting. Avoid coarse carbide barrels — they are for bulk acrylic.
What speed should I use to drill off gel?
The lowest speed that removes material without you pressing on it. On most home machines that is a small fraction of the top figure. Pressure, not speed alone, is what drives heat into the nail bed.
How do I know when to stop drilling?
While you can still see color on every nail. There is no reliable visual cue for reaching the last of the product, so the stop point has to be set earlier than feels finished. A thin, even veil of color across the whole plate is correct.
Does drilling gel off damage your nails?
It does if you go through to the plate, hold the bit still, or press. Done as a thinning step at low speed with a safety bit, and finished with acetone, it is no more damaging than filing — and it is shorter, which means less acetone exposure overall.
Keep reading
Related guides
- Removing gel without a drill →
The acetone-only method.
- Best drill for gel removal →
The machine picks.
- Are nail drills safe? →
Rings of fire explained.
- How to use a nail drill →
Start here if it's new.
Sources
- —AAD — Removing gel polish · aad.org
- —AAD — Reduce artificial nail damage · aad.org
- —NAILS Magazine — 5 things you should know about e-files · nailsmag.com
- —Scratch Magazine — Rings of fire · scratchmagazine.co.uk
- —Makartt — nail drill bits · makartt.com
- —MelodySusie — SC320G · melodysusie.com
- —Makartt — remover foil wraps · makartt.com